Installation With Baseplate
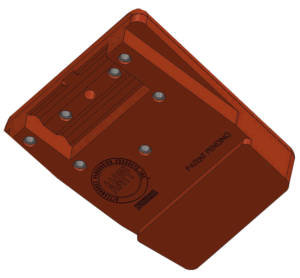
Your NEW Renzi® STOMP LOUDER®- Advanced Heel Pedestal System™ (AHPS) with Recovery Technology™ R100 Top-Plate Kit contents:
| 1 – R100 Top-Plate | 3 – _____- inch Flat Head Screws |
| 4 – Star Lock Washers | 5 – Screw Hole Protector Plugs |
| 4 – 3/8-inch Pan Head screws | 1 tube Vibra-Tite thread locker |
| 1 – Hinge Adapter Plug |

Step 1: Hold the bass drum pedal while wearing an oven mitt (Photo 1). Using a heat gun (on the closest 750F setting your gun has, ours was on “Low”) heat the top of the footboard, over the screw holes, for 3 to 5 minutes to loosen the thread locker grip used on each screw. Set the heat gun down and begin removing screws.
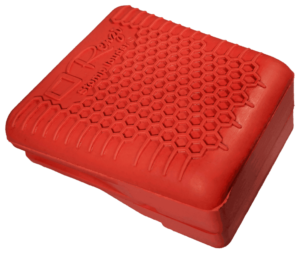
 Step 2: Remove the two factory-installed pan head screws and star washers securing the hinge plate to the base of the stock heel plate and the pedal Frame (Photo 2), and the two pan head screws and star washers securing the hinge to the footboard. Set screws aside. Step 3: Before securing the hinge back on the footboard and onto the Renzi R100 Top-Plate, ROTATE THE HINGE 180 degrees. You will attach the wider half of the hinge to the footboard (as shown in Photo 4), while the narrower half will secure to the new R100 Top-Plate (as shown in Photo5). Turning the hinge 180 degrees for reassembly will NOT affect the performance of the hinge! NOTE: Do not flip the hinge plate over; rotate it 180 degrees ONLY. Step 4: Locate the four 3/8-inch pan head screws, four-star washers and tube of Vibra-Tite from your CLEAR hardware bag. Step 5: Apply one or two drops of Vibra-Tite to each 3/8-inch pan head screw (Photo 3). Step 6: Using the pan head screws and two-star washers, secure the wider half of the hinge to the footboard (Photo 4). Step 7: Apply Vibra-Tite to the remaining two 3/8-inch pan head screws. Align the holes from the R100 Top-Plate to the bottom hinge plate over the bass pedal frame. Insert the remaining two 3/8-inch pan head screws and star washers to secure the R100 Top-Plate to the pedal hinge plate and frame (Photo 5). DO NOT OVER TIGHTEN. Step 8: From the CLEAR hardware bag, remove the five red protector plugs. Install the five protector plugs into the open screw holes on the bottom of your R100 Top-Plate (Photo 6). This procedure will help keep the unused screw holes clean for future use! CONGRATS! You installed the Renzi (AHPS) R100 Top-Plate to your Frame Only DW® series bass drum and hi-hat stand pedals. “Drum On”! NOTE: The Renzi® (AHPS™) R100 Top-Plate was engineered with our New “Recovery Technology™” and is thicker, wider and longer than the metal stock heel plate necessary to establish proper player balance, stability and comfort. Using the R100 Top-Plate will not change your pedaling technique; it will provide immediate added value to your pedaling!
Step 1: Turn the bass drum pedal over and remove the three ____-inch pan head screws (?) and two-star washers securing the R100 Top-Plate to the bass hinge plate, pedal assembly and frame (see Photo 2)
NOTE: If you used Vibra-Tite to secure the R100 Top-Plate, you only need a #2 Phillips-head screwdriver to remove each screw. Apply additional pressure with the screwdriver; you should not need the heat gun.
Step 2: Remove the Frame to Plate Hinge (Photo 3) and fit the R200 Elevation Plate to the bottom of the R100 Top-Plate (Photo 4).
Step 3: With the R200 Elevation Plate in position, align the screw holes through the three “R” Series Plates and position with the two holes of the Frame to Plate Hinge OVER the frame (Photo5).
Step 4: Install the two _____-inch pan head (?) screws (from the R200 YELLOW hardware pack) with a star washer for each screw. Working from the bottom of the hinge plate OVER the frame and through each hole, insert the screw and star washer, and secure the R200 Elevation Plates to the R100 Top-Plate (Photo 6). DO NOT OVER TIGHTEN.
Step 5: From your YELLOW hardware pack remove the third pan-head screw. Without using a star washer, install this pan-head screw in the center hole just above the frame and hinge plate (Photo 7). This is where the ‘Thread Protection Plug’ (Photo 8) was removed from R100 Top-Plate at the beginning of R200 Elevation Plate installation.
NOTE: During the R200 Elevation Plate installation process, you can leave the remaining Thread Protection Plugs in the R100 Top-Plate holes which are not being used. The Thread Protection Plugs will keep the holes clean from any dirt, dust or debris while playing on your “Frame-Only” DW® hardware drum and percussion pedals.
If you choose to use your Renzi® (AHPS)™ R100, R200 and R300 Kit on any other series of DW® hardware drum and percussion pedals, remove the Thread Protection Plugs (Photo 9) and put back in the R100 Yellow hardware bag (included in your R100 kit) before attempting to install your Renzi® (AHPS)™ R100 Top-Plate, on ANY other DW® pedal series. Photo 9
CONGRATULATIONS! You installed the Renzi® (AHPS)™ “Double Stack” to your DW® Model Series pedal without base-plate/bed; Photo 1) 3000, 5000, 6000, and 7000 Single Bass and Hi-Hat Stand Pedals…and “Drum On”!
Step 1: Turn the bass drum pedal over and remove the three 1-inch pan head screws (?) and two-star washers securing the R100 Top-Plate and R200 Elevation Plate to the bass hinge plate, pedal assembly and frame (see Photo 2)
NOTE: If you used Vibra-Tite to secure the screws through the R200 Elevation Plate to the R100 Top-Plate, you only need a #2 Phillips-head screwdriver to remove each screw. Apply additional pressure with the screwdriver; you should not need the heat gun.
Step 2: Remove the Frame to Plate Hinge (Photo 3) and fit the R300 Elevation Plate to the bottom of the R200 Elevation Plate and R100 Top-Plate (Photo 4).
Step 3: With the R300 Elevation Plate in position, align the screw holes through the three “R” Series Plates and position with the two holes of the Frame to Plate Hinge OVER the frame (Photo5).
Step 4: Install the two 1 1/2-inch pan head (?) screws (from the R300 YELLOW hardware pack) with a star washer for each screw. Working from the bottom of the hinge plate OVER the frame and through each hole, insert the screw and star washer, and secure the R300 and R200 Elevation Plates to the R100 Top-Plate (Photo 6). DO NOT OVER TIGHTEN.
Step 5: From your YELLOW hardware pack remove the third pan-head screw. Without using a star washer, install this pan-head screw in the center hole just above the frame and hinge plate (Photo 7). This is where the ‘Thread Protection Plug’ (Photo 8) was removed from R100 Top-Plate at the beginning of R200 Elevation Plate installation.
NOTE: During the R200 and R300 Elevation Plate installation process, you can leave the remaining Thread Protection Plugs in the R100 Top-Plate holes which are not being used. The Thread Protection Plugs will keep the holes clean from any dirt, dust or debris while playing on your “Frame-Only” DW® hardware drum and percussion pedals.
If you choose to use your Renzi® (AHPS)™ R100, R200 and R300 Kit on any other series of DW® hardware drum and percussion pedals, remove the Thread Protection Plugs (Photo 9) and put back in the R100 Yellow hardware bag (included in your R100 kit) before attempting to install your Renzi® (AHPS)™ R100 Top-Plate, on ANY other DW pedal series. Photo 9
CONGRATULATIONS! You installed the Renzi® (AHPS)™ “Triple Stack” to your DW® Model Series (without base-plate/bed; Photo 1) 3000, 5000, 6000, and 7000 Single Bass and Hi-Hat Stand Pedals…and “Drum On”!


